I will blow my own trumpet and push my Bolt Action and Chain of Command module and discuss the nature of using the computer as a virtual tabletop for our toys. To avoid any risk of a ‘cease and desist’ my module has no mention of any well known WW2 ‘1 figure as 1 man’ set of rules. It does just happen to have all the templates needed for Bolt Action and Chain of Command. Co-incidentally there is also an order dice picking system using dice (to be honest cards) hidden in a bag. The original module is on VASSAL.
VASSAL is a computer program that will run on just about any operating system (I use Linux) that will display images that can be moved around on top of each other and allows their current state to be saved. It also includes a dice rolling and card management system and has the option to do more if you fancy diving under the hood. This is more than enough for our sort of games and there are some very fancy modules out there for popular board games. The system cannot know the game rules but can be set to force actions to run in a particular sequence and to carry out some of the routine bookkeeping and calculations. VASSAL has a perfectly good designer’s manual. This article is a less dry walk through of designing a miniatures game module. It is best followed with the WW2 Skirmish module open in edit mode.
There are remarkably few miniatures modules out there. This could be due to the relatively high number of possible pieces compared to many board games and the scaling factor in choosing a system to simulate. It would be great to cover the really big games with lots of models. To shrink these down so it all fits onto a computer screen those models are going to be pretty darn small. VASSAL does let you zoom in and out but who wants to do all that zooming to find and move each unit or model? If detailed images are used and there are a lot of different models involved the file size is going to bloat. On the other hand consider a smaller scope game such as Pulp Alley, Two Hour Wargames or the ‘Song of’ series. These require a relatively small play area that is not going to be a lot bigger than a large computer monitor. So few zoom issues but considering the small footprint of the original it would be a better solution to play the game with models and use video conferencing software to share the game experience. Bolt Action does fit into the Goldilocks zone, at 750 or so points anyway. There are not too many moldels to move around. Also the vague ‘no pre-measuring’ rule helps out. VASSAL can be set to measure distances for movement and ranges, it can even pre-set movement distances. In real life Bolt Action games there is a deal of fudging ranges and moving. It is way too much trouble to measure every single model move. Often a few figure moves within a unit are measured and the rest of the unit fudged around that. This fits in well with less precise moves through dragging with the mouse.
In practice VASSAL can be used for PBEM although I would suggest an external voice line rather than relying on the chat function. It has more potential as a way of trying out armies and terrain. The big hassle with miniatures gaming is getting out all the terrain and figures. With VASSAL terrain can be set up and troops laid out on the side of the virtual table. The game can then be saved and played with minor variations more than once. For example running the same forces and terrain but swapping the scenarios and victory objectives. Another application is as a tool for writing up battle reports.
My design goal was to get something out there that was good enough. Not to spend forever trying to get everything in. There are a host of different troop types and weapon systems across the various protagonists. Rather than try for them all I picked the popular systems and went with axis or allied infantry, they will fill in for whatever nations are required. An initial step was to look at what was out there. The most similar starting point was the 40K module. This is not on the VASSAL site, indeed due to GW’s vigorous IP defense it takes a bit of tracking down. It is quite possible to play Bolt Action using the 40K module. The key problems are the lack of a dice pull system and the presence of a great deal of detail that is never going to be needed, plus the tanks look a bit odd. On the plus side the graphics are amazing, if useless for WW2 and I worked out some design tricks for later resuse. For graphics I went to Junior General. They have top down graphics of a constant scale. I posted on the forum and sent messages to the key artists and no one objected. This gave a source of acceptable images although these needed to be scaled down and cropped to ensure that each had a transparent background.
The game and map scale was based on that used for the 40K module. The game scale is 15 pixels to 1 inch for moving and firing. 15 pixles to 1 metre for model scale. The infantry figures were re-scaled to look ‘about right’ next to the vehicles. Some terrain is from Junior General, some is hand drawn.
Setting up
What follows are some design issues that I overcome and which might be of use to others in improving this module or creating others. Any module file is just a renamed zip file. Opening in an archive manager will show the graphics files. I would not suggest stealing someone else’s graphics but it is useful to see the exact size in pixels used for units, markers and terrain. Any module can also be opened in edit mode. This gives full access to the code and layout although the nature of VASSAL will mean that you know a feature has been implemented but tracking down where can be more difficult. The overall approach is to do a bit, save it and try it out. This will show up issues straight away. No one wants to create a slew of graphics and find that it all looks wrong in play. It is relatively straightforward to swap out graphics if the original files are the same size. So start with graphics that are good enough and swap them out when something better comes along.
This is the file structure of a brand new module. Lots of folders, the only file with useful data sets the standard fonts.

A board is a good place to start. Right click on map boards and add a map. I used, cell scale factor = 0.2, cell width 350, cell height 125 (the default) and linked to uploaded png images 1080 * 720 pixels.
Now to test this we need a game piece. Right click on game piece pallete, add a scrollable list, then a pull down menu. Then add a single piece. All it needs for the time being is a name and a single image. I used the game scale of 15 pixles to 1 metre for models and re-sized images to fit this scale. The image is best with a transparent background and using a circle of the backing colour as a base behind it.
Save the work and open the module. If the module opens up with 1 piece that can be moved around the board then you are off. If not start again. Do not create a lot of pieces at this stage. The trick is to create piece patterns that obey certain rules then copy those patterns.

Another easy starter is adding a dice button. Right clicking on the top folder of the file directory shows this amongst other actions. Several dice buttons can be added, with different sides and combinations.

This is a multi-dice window that prompts for the number of dice to roll. The report format should be tweaked to change how the user sees the results in the output Window.

Another easy but useful option is the ‘line of sight thread’. This is added by selecting ‘Main Map’ and right clicking. It is possible to have more than one of these (as with multiple dice). One can be used for line of sight and another to calculate range. The following properties work as a range ruler:

Game Pieces
In a miniatures game the pieces have various roles. Popular categories would be the models that move around, the terrain that does not move after placement and the templates that do move but are translucent so the elements underneath can be seen. In the menu 3 diagrams up is a section to add ‘game piece prototype definitions. A definition can be given any name and set with certain traits. This is the definition for an infantry prototype:

Each trait needs to be set with appropriate values. Most are easy to guess. A movement of 1″ at our scale will be 15px. The marker layer is to get infantry on top of terrain but under templates. Terrain is not going to need all those move traits.
The layer (not marker layer) trait is worthy of some investigation. Choosing its properties shows a window to define layers of the object itself. In this implementation a number of images have been created that consist of a ring on a transparent backgound. As the user cycles through the bases with the set keys a different ring appears around the piece the trait is linked to. This allows a piece to have a choice of rings around it. This can be used to denote troop type (regular or veteran), wounds or what not.

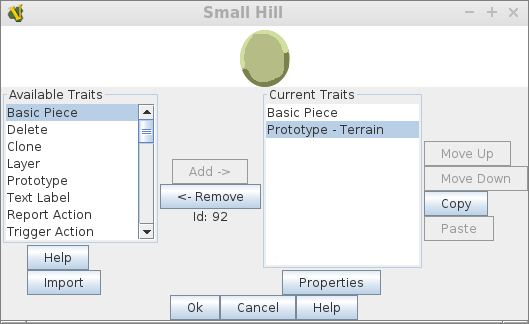
This definition is in the SmallBase prototype and is used by the small infantry units.

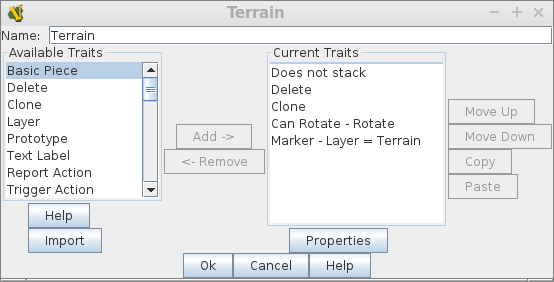
The movement or otherwise of a piece is governed by ‘does not stack’, set here for the Terrain models. Here a piece will only move if selected with shift first. This is to prevent a unit moving into some terrain then back out but taking the terrain with it on the way out.

Here is a basic infantry piece with its prototypes and other properties. VASSAL does not pick up the traits automatically. They have to be typed up as required. The restricted access setting is to restrict use of this piece to the axis side or a neutral observer.

Here is a terrain definition.
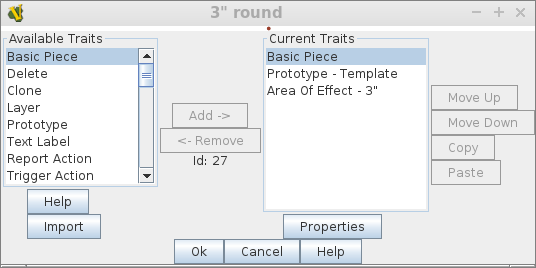
Here for comparison is a template. Note that the graphic is a tiny dot. The area of effect sets the template effect by the opacity and radius of effect.

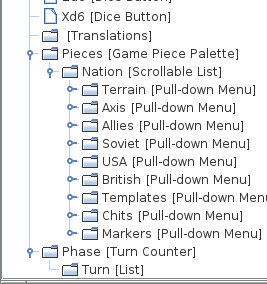
The above instructions will allow a range of suitable game pieces to be created. To help organise these and make it easier for the player to choose the correct one they should be organised into pull down menus. Some of the templates and markers here are generic circles, squares or dots that the player can use for their own devices. At this point a small selection of pieces should be created and the module tested to ensure that they all work together as expected.
Cards
Bolt Action does not have any cards but these are the best mechanism to portray the dice order bag because cards can be shuffled and dealt. VASSAL cards can be any size and the front does not have to be the same size as the back. For Bolt Action there will be a largish back so the dice pile is easily seen but a small front so the pulled dice do not dwarf the virtual models. A reverse of this might be Pulp Action. Here a small back will keep the deck discrete but a large front makes the text easy to read.
For the dice bag the fronts are a small red or blue square and the back a slightly larger green square with a ‘?’. It is not easy to create 6 sided cards to model ambush settings and the like. Players will have to use a generic marker for ambush. Right click on ‘Main Map’ and add a deck. Note that the contents are face down and the deck always shuffles.

Here is a blue card or chit, note the ‘return to deck’ setting.

The Mask property is used for the back of the card.

Any piece could have a mask. Another application would be to have a brewed up image of a vehicle on the mask. It could then be flipped when destroyed. I cut back on the drawing work and created a generic smoke trail piece instead.
The dice bag has 1 chit/card in it at the game start so the player can find the pack. Right click on the deck and ‘add card’. A red and blue card also both need to be created as game pieces. When preparing for play the gamer should choose the required number of cards and drop them in the bag (drag them on top of the deck). That seems too much trouble but it can be automated.
Ctr_R has been set as the shortcut used to return the cards to the deck.

Right click on ‘Main Map’ and ‘add global key command’. This creates a button that sends Ctr_R to all pieces on the board.

That was enough to get a ‘not Bolt Action’ module off the ground. The easiest way to set up a game is to drag the pieces needed for each side to a space off the side of the map. Copy and paste is as one would expect so set up 1 squad and copy as required. Take care in that copied pieces appear exactly on top of the original. They can be dragged out of the way but over zealous copying can lead to more units than you expected all stacked up. the delete feature of pieces will sort this out. If playing an on-line game 1 player can set up all the units to the side of the board before beginning the game. This will save on pre-game down time.
It might be of help to use a wider map-board and mark a section off one side for setting up. The artistic types might want to create pieces for coffee cups, bags and other gaming ‘junk’ to drop here. This section should be at the side not the top and bottom as the computer screen dimension ratio in combination with game table ratios gives plenty of free space to the side of the table. Adding more real estate to the top or bottom would zoom the whole view out to fit in the new area with the consequent loss of clarity.

